This beautiful vintage 1970s Springbok fairy puzzle was one such find. I absolutely love Springbok puzzles - the pieces always fit together so well (I hate loose puzzles) and the pieces are different enough so they are not slightly interchangeable (that can really screw things up). The box is even cool. The cute fairies, plants and animals made it an obvious buy for me.
Too bad it was missing a piece. GAH!
I decided that it was too cool a puzzle to go to waste, so I thought I would try my hand at making my own puzzle piece replacement. It turned out pretty well! :D
Try it yourself! Here's a tutorial on how I made the replacement puzzle piece:
What you will need:
- scanner
- photo editing program such as Photoshop
- printer, ink & paper
- cardboard about the same width/thickness as your puzzle
- pencil
-ruler
- scissors
- glue stick
1. Scan the box top
2. Scan the part of the puzzle with the piece missing
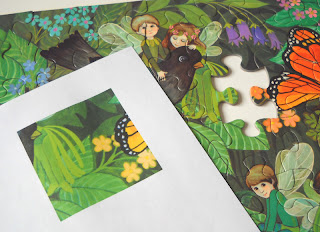
3. Using a photo editing program (like Photoshop) Overlay a section of the scanned puzzle pieces on top of the image of the scanned box top - move around the piece to match (see image below). Also: You will probably have to resize the puzzle pieces to be smaller since the puzzle is usually bigger than the box top. This will take a little trial and error. For my puzzle I shrunk the puzzle pieces image to 71%.
4. Select a rectangular box around the missing puzzle piece so that the top and bottom are right at the edge of the box.
5. Now, on the layers palette, move the puzzle box image over top of the missing piece image (you can click and drag the layer to move it). The box should still be there!
6. Select copy. Now select 'new' and paste the box into the new blank image.
7. Measure the size of the missing piece (well, measure the size of the empty space where it should be).
8. Change the size of the new image you just made so that it matches the height of the actual puzzle piece. In photoshop select 'image' then 'image size' and in the pop up box change the height to match the puzzle piece height.
9. Print out the new image.
10. Lay the print out under the actual puzzle pieces and match it up.
11. Use a pencil and lightly draw the shape of the puzzle piece on the paper - use the empty space to trace the shape.
12. Cut out the puzzle piece - you may want to cut just slightly outside of your drawn lines. Erase the lines.
13.Get a piece of cardboard that is similar in width/thickness to the actual puzzle pieces.
14. Lay the puzzle piece on the cardboard and trace it in pencil.
15. Cut out the puzzle piece on the cardboard (this can be tricky - I had difficulty even with a big piece). After cutting, try to fit it into the puzzle - adjust as needed.
16. Glue the paper puzzle face to the cardboard piece.
DONE!
Granted, this probably won't work with small pieces and it can be a lot of work for one puzzle piece. The end result is definitely not perfect (the colors will probably not match perfectly, the piece will not be glossy, and the edges won't be perfectly crisp), but better than a missing piece I say. It was a fun challenge for me!
Alternatively, you can also have the Jigsaw Doctor make you a replacement piece (though it will cost you!):
http://www.jigsawdoctor.com/


This worked for me...Thanks. I wish I could spray the replacement with a shiny overlay that would match the other pieces. It would be perfect then!
ReplyDeleteThis comment has been removed by the author.
ReplyDeleteI have to ask you where you found this puzzle. This was my absolute favorite puzzle when I was a child. I’d spend hours deciding which fairy I wanted to be and then pretending in the woods around my house. Such sweet memories!
ReplyDeleteMe too. I've been searching for it for 30 years
DeleteThis was my favorite puzzle as a child too. I had 2 pieces of it somehow left in my possession. I have been trying to find it for years. I took a screenshot and will try a Google image search to find one for sale.
Delete